Today we share with you how we built the plywood sub-floor in our van. And this is a big day for us because we went round and round for a long time trying to decide what insulation to use in our van. Without an answer here, we couldn’t start the most basic part of our build: the floor. Like many people we’ve seen online, the more research we did, the more confusing and contradictory things got.
But we ultimately opted for a natural product – Sheep’s wool from Havelock Wool, imported from New Zealand. We had heard good things about wool and this video from Finding Fresh Air sealed the deal for us.
Our video above shows how a lot of the floor came together, but it’s sometimes difficult to shoot video when you’re also building and problem solving at the same time. Because of that, a few details got left out of the video so I thought I’d add some explanation here.
Install Furring Strips
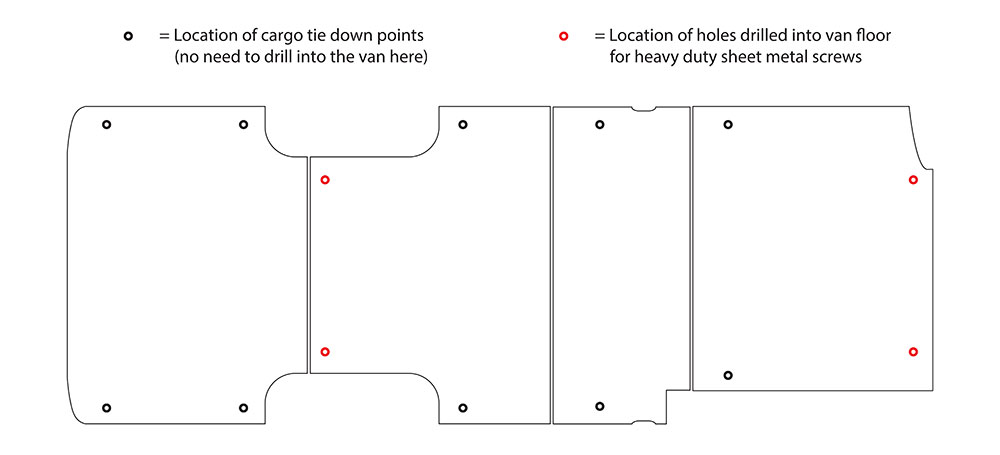
We used furring strips to attach the plywood. The furring strips are glued to the van floor using heavy duty construction adhesive. Then, the plywood is screwed to the furring strips and bolted into the cargo anchor mounting points. There were only 4 places where we felt it was necessary to screw the plywood directly to the van floor. (see drawing below).
The furring strips were ripped from standard 2×4 material we picked up at our local lumber yard. We bought three 12 foot 2×4’s. One of these was ripped down to make three 1″ strips. The other 2 were ripped right down the middle to make 2 strips each at 1-3/4″. (As you may know, 2×4’s are not exactly 2″ x 4″. They’re more like 1-1/2″ x 3-1/2″ because of planing that happens on all the edges.) So, when ripped right down the middle, the 3-1/2″ dimension becomes 2 pieces at roughly 1-3/4″. And this worked out perfectly because the 3 main channels or “valleys” down the length of the sprinter floor, are actually 3/4″ deeper than the tops of the ridges.
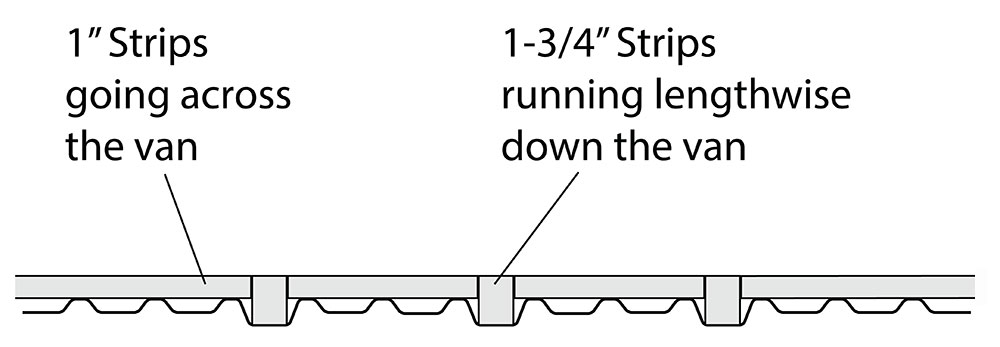
So, laying 1″ strips across the ridges and the 1-3/4″ strips down these deeper valleys means they meet perfectly flush at the top. And this is what the plywood floor lays on. Nice and flat with room underneath for 1″ of insulation. Also note that they are positioned to make sure there is one at the edge of each of the plywood panels
Fit and attach the Plywood Panels to the Floor
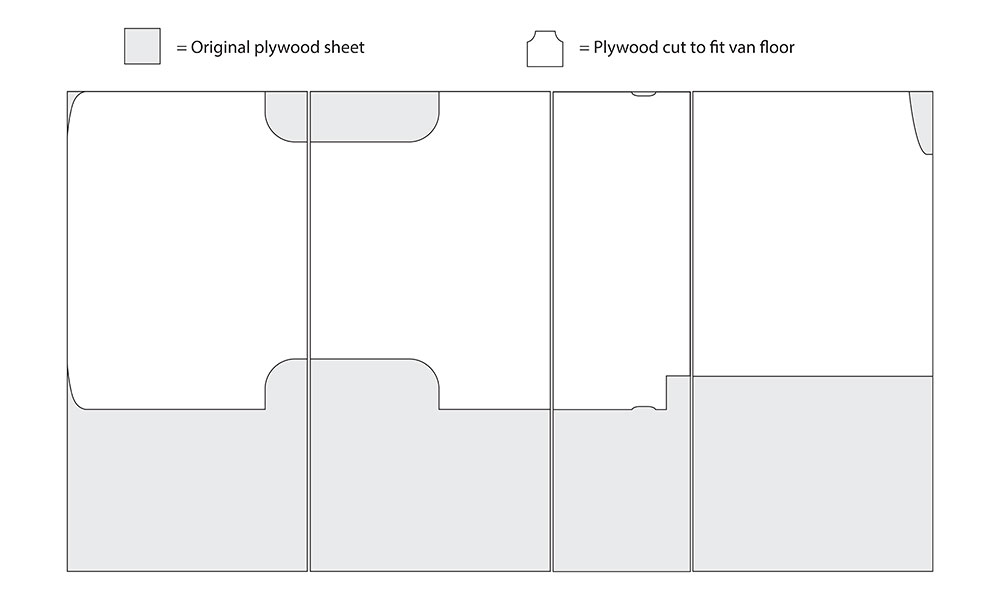
In the video, we didn’t really go into how the pieces of plywood fit in relation to the van floor edges and with the furring strips, so here’s a rough drawing of how we cut the plywood sheets. (note that this is sketched from memory – it’s not to scale or anything so don’t enlarge it and use it to cut your plywood or you’ll be sorry when it doesn’t fit your van).
First – here’s how we cut the 4 sheets of plywood:
(Note, the 3rd panel was cut from a full sheet as well but I’ve trimmed it down in this illustration to show the contour of the finished floor)
Next – here’s where we drilled the holes:
And finally, here’s where we laid the furring strips:
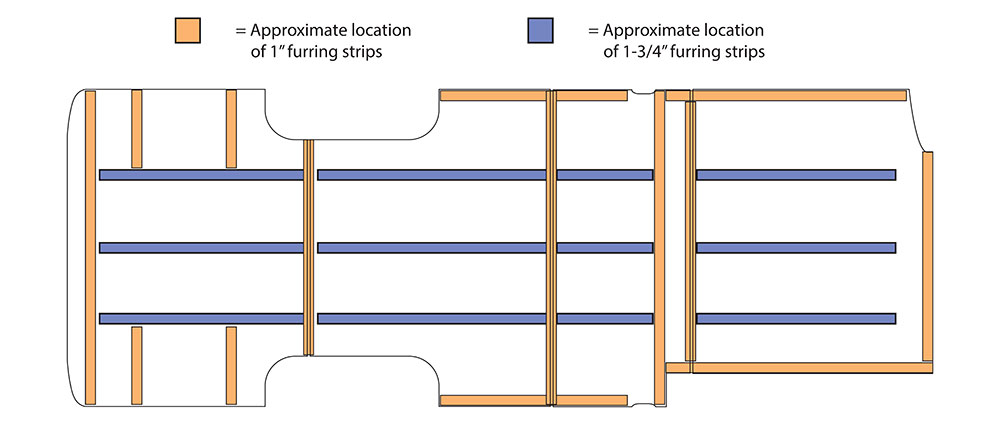
We wanted furring strips centered between each joint where the floor panels meet so we could secure their edges and make sure the panels were flush with each other. We also wanted furring strips near the holes so that when we tightened the fasteners down, the panel would not flex into the wool insulation too much but instead would remain flat at 1″ off the van floor.
Better Bolt Hole Locations
In the video, we mentioned a problem with the pointers used to locate where to drill the holes for the bolts. But here’s a final note that wasn’t in the video:
When looking at the video it appears I may not have been holding the drill straight when I drilled from the bottom where we marked the hole locations with the little pointers we made. I think that if I would have been drilling 90 degrees into the sheet, and also that if we would have used slightly larger bits for the bolt holes and washer countersinks, we might have been fine with the little point markers.
And maybe being just a bit more careful ensuring the final placement of each panel before stepping on it to mark the drill location too. I think the holes drilled from the pointer marks would have worked much better if we would have done all that.
So there it is. This is all stuff that would have been nice to include in the video, but like I said – when you’re on a time crunch and really trying to finish a project, all at the same time that you’re problem solving as you build, the video production sometimes takes a back seat. In the future we hope to show more of the problem solving aspect and thus have more complete videos to share.
But if you’ve read this far, thank you and I hope this helps if you’re wanting to install a floor similar to this. Feel free to ask questions in the comments and we’ll be happy to get back to you.
4 thoughts on “How we Installed a Plywood sub floor in our DIY Sprinter Camper Van”
Hi. I messaged you on utube but then I scrolled further to see that you mentioned this article. Thank you for the explanation on this with the different sizes. I have an 02 sprinter so I hope it’s the same dimensions. I will check of course.
Thank you.
Melissa
Thanks Melissa, let us know if you have any questions…
I need a layout for Sprinter 144 furring strips layout, do you have them?
Hi Rey,
No we don’t have that layout, sorry. We’ve only built out the one van and it’s a 170…